Disc Golf Throwing Fundamentals
There are three primary throws in disc golf: the backhand, the forehand (also called the sidearm), and the overhead. Every shot you will ever play on a disc golf course is a variation of one of these three throws, shaped by your release angle, disc selection, and power level.
The backhand is where almost every player starts and where most players do the majority of their work on the course. The forehand comes next as your game develops and you encounter situations where a backhand approach doesn't fit the hole layout. The overhead is a specialty throw used to navigate obstacles that neither backhand nor forehand can clear.
Beyond the throw type, understanding release angles is what separates players who can shape shots intentionally from those who just throw and hope. The three angles are hyzer, flat, and anhyzer. These concepts unlock a completely different level of shot-making once you have your basic form dialed in.
Before you focus on distance: Form comes first. Every disc golf coach will tell you the same thing. Most players try to throw too hard too early, which builds bad habits that are very difficult to undo. Develop a smooth, consistent release at 70% power before you ever try to add distance.
The Backhand Throw
The backhand is the foundational throw of disc golf and the one you'll use most often throughout your game. It is called a backhand because the disc is held in a similar position to a backhand swing in tennis. The back of your hand faces the target at the start of the motion.

The Backhand Grip
There are two common backhand grips: the power grip and the fan grip. For most beginners and for driving off the tee, start with the power grip.
Power Grip: For Driving
Curl all four fingers tightly under the rim of the disc, with your thumb pressed firmly on top. The disc should feel locked in your hand. This grip maximizes the snap at release and is used for full-power tee shots and long throws.
Fan Grip: For Control
Spread your four fingers across the underside of the disc rather than curling them under the rim. This grip gives you more feel and control at slower speeds, making it ideal for approach shots and putts where accuracy matters more than distance.
Backhand Form: Step by Step
Address the Tee
Stand at the tee pad with your non-dominant foot forward, body perpendicular to your target line. For a right-handed thrower, your left foot is forward and your right foot is back.
Reach Back
Pull the disc back across your chest, keeping it at chest height. Your arm should be fully extended behind you with the disc pointing roughly at your rear hip. Keep the disc flat and do not let it tilt up or down on the reach back.
Drive Through With Your Hips
The power in a disc golf backhand comes from your hips and core, not your arm. As you begin the forward motion, rotate your hips toward the target first, then your shoulders, then your arm follows. Think of it as unwinding a coil from the ground up.
Snap and Release
As the disc reaches the release point in front of your chest, snap your wrist forward sharply. This wrist snap is what generates the spin on the disc, and spin is what makes the disc fly straight and far. Release the disc on a flat plane at chest height, pointing it at your target.
Follow Through
After releasing the disc, continue your arm motion across your body and finish with your throwing arm wrapping around toward your opposite shoulder. A full follow-through indicates you committed to the throw rather than decelerating before release.
The most common beginner mistake: Releasing the disc at the wrong point. Too early and the disc flies right and low. Too late and it goes left and into the ground. Practice the motion slowly and focus on releasing directly in front of your chest, pointing at the target.
The Forehand (Sidearm) Throw
The forehand, also called the sidearm or flick, is disc golf's second primary throw. It releases from the side of your body rather than across it, producing a flight that naturally curves in the opposite direction from a backhand for the same thrower. For a right-handed player, a forehand curves to the right.
The forehand is essential for shots where a backhand approach does not fit. Think holes that dogleg right, tight gaps on your right side, or situations where your backhand release angle would send the disc into an obstacle. Many players find the forehand easier to throw accurately at shorter distances, which also makes it useful for approach shots.

The Forehand Grip
The standard forehand grip uses two fingers. Place your index and middle fingers along the inside of the rim on the underside of the disc, with your middle finger touching the inner rim and your index finger behind it. Your thumb goes on top of the disc. Your ring finger and pinky curl in toward your palm. The disc should feel stable but not pinched.
Forehand Form
Stand with your dominant foot forward, body open toward the target. Hold the disc at waist height, arm at your side. Pull back by extending your arm behind you, keeping your elbow bent at roughly 90 degrees. Drive forward, leading with your elbow, and snap your wrist at the release point. The disc releases from roughly hip height and travels on a lower, flatter trajectory than the backhand.
Disc selection for forehand: Overstable discs work better for forehand throws because the forehand naturally adds turn to the disc's flight. An overstable disc resists that turn and gives you a more controllable, predictable flight path. Understable discs thrown forehand will turn over and crash for most players.
Release Angles: Hyzer and Anhyzer
Once you have a consistent backhand or forehand, release angle is the next concept that dramatically expands your shot-making ability. The angle at which the disc leaves your hand determines how the disc will curve during flight, completely independent of which disc you are throwing.
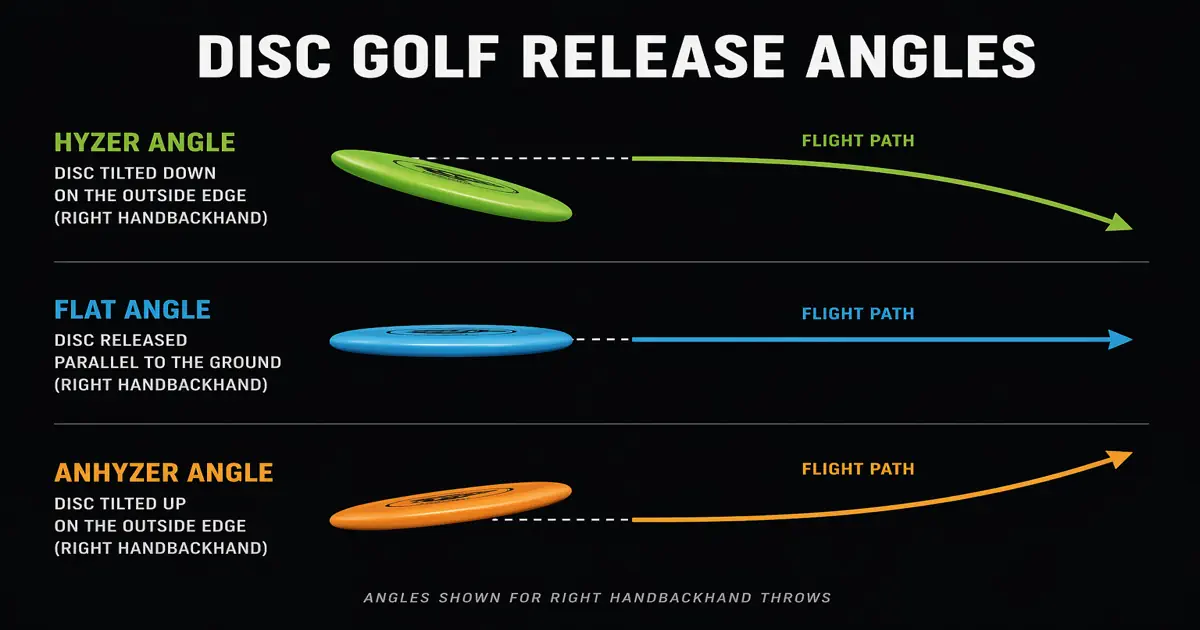
Hyzer: Disc Tilts Away
A hyzer release means the outside edge of the disc (the edge away from your body on a backhand) is tilted down at release. For a right-hand backhand thrower, this makes the disc curve to the left during flight and fade harder left at the end. Used intentionally to navigate obstacles on the left side of the fairway or to produce a reliable left-finishing shot.
Flat: Disc Level at Release
A flat release means the disc is parallel to the ground at the moment of release. This is the baseline release angle and produces the most neutral flight. The disc flies according to its designed turn and fade without any angle exaggerating either direction. Most beginners should aim for a flat release until they understand how their disc behaves.
Anhyzer: Disc Tilts Toward You
An anhyzer release means the outside edge of the disc is tilted up at release. For a right-hand backhand thrower, this makes the disc turn right early in flight. Used to navigate obstacles on the right side, to produce a right-curving shot, or to set up a specific approach angle into the basket.
The Hyzer Flip
The hyzer flip is one of the most useful shots in disc golf once you understand release angles. It involves throwing an understable disc on a hyzer angle. The disc starts on the hyzer angle, then flips to flat as it gains speed, then continues flying straight (or with a slight turn) before finishing with a gentle fade.
The result is a long, straight, S-curve flight path that covers maximum distance with maximum control. Many experienced players use hyzer flips as their primary driving shot because it produces the most consistent results across a wide range of distances.
The Overhead Throw
The overhead throw - also called the tomahawk or thumber depending on grip - is a specialty throw used when a low-flying disc simply cannot navigate the obstacle in front of you. Tall trees directly in your line, a narrow gap high in the canopy, or a disc stuck in a position that makes a backhand impossible are all situations where the overhead throw earns its place.
Tomahawk
The tomahawk uses a backhand-style grip with the disc held vertically - thumb on the inside of the rim, fingers on the outside. The disc is thrown overhand like a baseball, releasing vertically. For a right-handed thrower, the disc will turn to the right and then fade back to the left, landing nose-down in a predictable arc. Useful for high, arching shots over tall obstacles.
Thumber
The thumber uses a forehand-style grip with the disc held vertically - thumb on the outside of the rim, fingers on the inside. Also thrown overhand, but the disc curves in the opposite direction from the tomahawk. For a right-handed thrower, the disc turns left and fades right. The thumber tends to produce a steeper arc than the tomahawk.
When to use overhead throws: These are specialty shots for specific obstacles. Do not try to make them a regular part of your game. The backhand and forehand will handle 95% of every situation you'll encounter on a disc golf course. Learn overheads once your core throws are solid.
Common Mistakes & How to Fix Them
Disc Turns Over and Crashes Right
You're releasing too early, releasing with anhyzer angle, or throwing a disc that's too understable for your arm speed. Fix: focus on a flat release directly in front of your chest. Try a more overstable disc.
Disc Fades Hard Left Immediately
You're throwing a disc that's too overstable for your arm speed, or releasing on a hyzer angle unintentionally. Fix: switch to a more neutral or understable disc. Check your release angle and aim for flat.
No Distance: Disc Dies Early
You're decelerating before the release point or not generating enough spin. Fix: focus on the wrist snap at release. Think fast arm and slow body. Your arm should accelerate through the release, not slow down approaching it.
Inconsistent Direction: Every Throw Goes Somewhere Different
Your release point is inconsistent. Fix: slow everything down. Throw at 50% power and focus only on releasing the disc at the same point every time. Aim directly in front of your chest, flat, and pointing at the target. Consistency comes before power.
Disc Hits the Ground 20 Feet in Front of You
You are releasing the disc pointing downward. This is called noobling or nose down. Fix: focus on keeping the disc at chest height through the entire throwing motion and releasing with the disc pointing slightly up, not down.